Understanding Stone Patios and Why They Need Specialist Cleaning

Understanding Stone Patios and Why They Need Specialist Cleaning

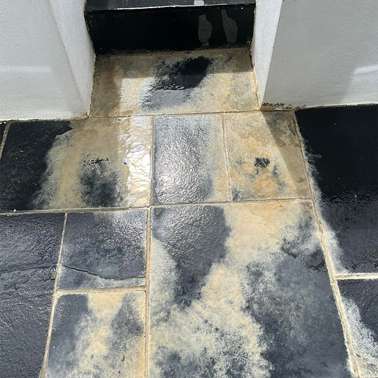
Stone patios are a popular feature in UK gardens, valued for their natural appearance, durability, and ability to elevate outdoor living spaces. However, despite their strength, stone surfaces are highly susceptible to staining, algae growth, and general weathering over time. Rain, shade, foot traffic, and organic debris all contribute to a gradual build-up of dirt that can make even the highest-quality patio look tired and uneven. Unlike artificial paving materials, natural stone is porous to varying degrees. This means it absorbs moisture, oils, and organic matter more easily, which can lead to long-term discolouration if not properly maintained. Cleaning a stone patio is not simply a case of blasting it with water. It requires an understanding of the stone type, its condition, and the correct combination of cleaning methods. At Pureseal Services, stone patio cleaning is approached as a restoration process rather than a basic wash. The goal is to return the surface to a clean, natural finish while protecting its structure and extending its lifespan.

Types of Stone Used in UK Patios

Before choosing a cleaning method, it is essential to understand the type of stone being treated. Different materials respond in very different ways to moisture, pressure, and chemicals.

Common Stone Patio Materials

Stone Type Characteristics Cleaning Sensitivity
Sandstone Porous, natural colour variation High
Limestone Smooth texture, alkaline composition Medium-High
Slate Dense, layered structure Medium
Granite Very hard, low porosity Low
Indian Sandstone Highly decorative, widely used High
Each of these materials requires a slightly different approach to ensure effective cleaning without damage.

Why Stone Patios Become Dirty Over Time

Stone patios are constantly exposed to environmental conditions that contribute to surface deterioration.

Main Causes of Patio Contamination

  • Algae growth in damp or shaded areas
  • Moss forming in joints and textured surfaces
  • Airborne pollution settling into porous stone
  • Soil and plant debris from surrounding gardens
  • Oil and food stains from outdoor use
  • Hard water deposits from rainfall and irrigation
Over time, these elements combine to create a layered build-up that becomes increasingly difficult to remove with basic cleaning methods.

The Risks of Incorrect Patio Cleaning

Improper cleaning methods can cause long-term damage to stone patios, often making them worse than before cleaning.

Common Mistakes and Their Effects

Mistake Resulting Damage
Excessive pressure washing Surface erosion and loss of texture
Harsh chemicals Discolouration or chemical burn marks
Inconsistent cleaning Patchy appearance after drying
Ignoring stone type Permanent surface damage
Over-wetting joints Loose or weakened paving structure
These issues are often irreversible, which is why professional handling is strongly recommended for natural stone surfaces.

The Best Professional Method for Cleaning Stone Patios

The most effective approach to cleaning stone patios is a controlled, multi-stage process that combines assessment, pre-treatment, cleaning, and finishing.

Step 1: Initial Inspection

Every patio should begin with a full surface assessment.
  • Identify stone type and condition
  • Check for cracks or loose slabs
  • Assess level of staining and organic growth
  • Determine drainage conditions
This ensures the correct cleaning method is selected before any work begins.

Step 2: Dry Surface Preparation

Before any water is used, the patio is prepared in its dry state.
  • Removal of loose debris such as leaves and soil
  • Manual clearing of weeds from joints
  • Inspection of problem areas requiring pre-treatment
Dry preparation improves cleaning efficiency and prevents debris from spreading during washing.

Step 3: Targeted Pre-Treatment

Pre-treatment is a crucial stage in professional stone patio cleaning.

Types of Pre-Treatment Used

Problem Type Treatment Method Purpose
Algae Biocide application Breaks down organic growth
Moss Fungicidal treatment Kills root structure
Oil stains Degreasing solution Lifts embedded grease
Black spotting Specialist cleaner Removes deep staining
Allowing sufficient dwell time is essential for these treatments to be effective.

Step 4: Controlled Pressure Washing

Pressure washing is used carefully and strategically rather than aggressively.
  • Low to medium pressure settings
  • Wide fan nozzles to reduce surface impact
  • Even, overlapping passes
  • Avoidance of direct joint erosion
The goal is to lift contamination without damaging the stone surface.

Step 5: Steam Cleaning for Delicate Areas

Steam cleaning is often used alongside pressure washing, especially on sensitive or heavily stained areas.
  • Ideal for natural stone
  • Reduces need for harsh chemicals
  • Minimises surface wear
  • Effective on embedded algae and grime
This method is particularly effective for older patios where preservation is important.

Step 6: Rinsing and Residue Removal

Once cleaning is complete, the entire surface is thoroughly rinsed.
  • Removes loosened dirt and chemical residue
  • Ensures even drying
  • Prevents patchy finish
Proper rinsing is essential to achieve a uniform appearance once dry.

Step 7: Drying and Final Inspection

Drying time is often underestimated but plays a key role in final results.
Weather Condition Drying Time Estimate
Warm and dry 24–48 hours
Mild conditions 48–72 hours
Damp or shaded 72+ hours
A final inspection ensures all areas have been cleaned consistently.

Equipment Used in Professional Stone Patio Cleaning

High-quality results depend heavily on the equipment used.

Essential Equipment List

Equipment Type Function
Pressure washer Removes surface dirt and algae
Steam cleaning system Deep cleaning without damage
Surface cleaner head Ensures even coverage
Soft washing system Applies controlled treatments
Hand tools Weed and joint cleaning
At Pureseal Services, commercial-grade systems are used to ensure precision and consistency across all stone types.

Cost of Professional Stone Patio Cleaning

Stone patio cleaning varies in price depending on size, condition, and complexity. High-quality services sit at the more premium end of the market due to the level of care and equipment involved.

Typical UK Pricing Overview

Patio Size (m²) Cleaning Cost (£) Deep Restoration (£)
10–30 m² £200 – £450 £500 – £900
30–60 m² £450 – £900 £900 – £1,800
60–120 m² £900 – £1,800 £1,800 – £3,500
Premium pricing reflects:
  • Specialist treatment products
  • Skilled labour
  • Advanced cleaning systems
  • Careful handling of natural stone

Factors That Influence Cleaning Difficulty

Not all patios require the same level of treatment.

Key Influencing Factors

Factor Impact Level
Stone porosity High
Age of patio High
Level of shade Medium-High
Drainage quality Medium
Maintenance history High
Poorly maintained patios typically require multiple treatment stages to fully restore.

Algae, Moss, and Lichen Removal in Detail

Organic growth is one of the most common issues affecting stone patios in the UK climate.

Why It Forms So Easily

  • Damp weather conditions
  • Lack of direct sunlight
  • Poor drainage
  • Organic debris accumulation

Effective Removal Strategy

  • Biocide application to kill spores
  • Controlled pressure washing to remove surface growth
  • Steam treatment for deep-rooted areas
  • Repeat treatment where necessary
This combination ensures both visible growth and underlying spores are addressed.

Preventing Future Patio Contamination

Once a stone patio has been professionally cleaned, preventative measures can help maintain its condition.

Recommended Maintenance Practices

  • Regular sweeping to remove debris
  • Periodic light washing
  • Immediate removal of organic matter
  • Keeping surrounding plants trimmed

Optional Protective Treatments

Treatment Type Benefit
Sealants Reduces staining and water absorption
Biocide protection Slows algae regrowth
Water repellents Improves drainage behaviour
These treatments reduce maintenance requirements and help preserve appearance over time.

Seasonal Considerations for Patio Cleaning

Timing has a significant impact on results.

Best Conditions for Cleaning

  • Mild temperatures
  • Overcast but dry weather
  • Low wind conditions
  • Stable weather forecast

Seasonal Impact Table

Season Suitability Notes
Spring Excellent Ideal for resetting winter damage
Summer Very good Fast drying, but risk of quick evaporation
Autumn Good High organic debris levels
Winter Poor Cold and moisture slow drying

Surface Restoration After Cleaning

Once cleaning is complete, some patios may require additional restoration work to fully improve appearance.

Common Restoration Tasks

  • Re-sanding joints where needed
  • Realigning displaced slabs
  • Light re-treatment of stained areas
  • Final detailing for uniform finish
These finishing touches ensure the patio looks consistent and professionally restored.

Why Professional Cleaning Delivers Better Results

While DIY methods can improve appearance temporarily, they rarely achieve the depth of clean required for natural stone.

Key Advantages of Professional Cleaning

  • Controlled pressure prevents surface damage
  • Specialist products target deep staining
  • Even cleaning across the entire surface
  • Longer-lasting results
  • Reduced risk of discolouration or erosion
At Pureseal Services, the focus is on delivering a high-end finish that enhances both appearance and durability, rather than quick surface-level improvements.

Maintaining a Clean Stone Patio Long-Term

Ongoing care is essential to preserve the results of a professional clean.

Long-Term Maintenance Plan

Frequency Task
Weekly Sweep debris
Monthly Light rinse
Quarterly Spot treatment
Annually Professional inspection
Consistent upkeep helps prevent heavy build-up and reduces the need for intensive future cleaning.

Final Surface Performance Expectations

A properly cleaned stone patio should achieve:
  • Even colour restoration
  • Removal of algae and organic growth
  • Clean joints and edges
  • No surface damage or erosion
  • Improved overall appearance
This level of finish reflects a careful, structured cleaning process designed specifically for natural stone surfaces.

Advanced Problem Areas on Stone Patios and How They’re Treated

Even after a full professional clean, some stone patios present persistent problem areas that require extra attention. These are usually caused by long-term neglect, poor drainage, or repeated organic growth in the same locations. Addressing these properly is what separates a surface that simply looks “cleaned” from one that looks properly restored. At Pureseal Services, these areas are treated as part of a detailed finishing process rather than an afterthought, ensuring the entire patio has a consistent appearance.

Deep-Set Black Spotting

Black spotting is one of the most stubborn forms of contamination on natural stone, especially sandstone and limestone.

What Causes Black Spots

  • Airborne pollution bonding with moisture
  • Algae growth embedded into pores
  • Iron or mineral deposits in the stone
  • Long-term damp conditions with limited sunlight

Treatment Approach

Stage Method Purpose
1 Specialist pre-treatment Breaks down organic material
2 Controlled dwell time Allows penetration into pores
3 Steam application Lifts embedded contamination
4 Rinse and repeat cycles Ensures full removal
Black spots often require multiple passes. Rushing this stage can leave faint shadows that become visible again after drying.

Efflorescence on Stone Surfaces

Efflorescence is a white, powdery residue that appears when salts rise to the surface of stone.

Why It Occurs

  • Moisture moves through porous stone
  • Dissolved salts are carried to the surface
  • Evaporation leaves crystalline deposits behind

Treatment Options

  • Dry brushing for light deposits
  • Controlled rinsing for moderate build-up
  • Specialist neutral cleaners for heavy cases
Severity Level Appearance Treatment Intensity
Light Faint white haze Low
Moderate Patchy white deposits Medium
Heavy Thick crystalline layer High
Efflorescence is often recurring if moisture issues are not addressed, so drainage plays an important role in prevention.

Drainage Problems and Their Impact on Cleaning Results

Poor drainage is one of the most overlooked causes of recurring patio staining and algae growth.

How Drainage Affects Stone Patios

  • Water pooling encourages moss and algae
  • Constant dampness accelerates staining
  • Uneven drying creates patchy appearance
  • Weakens jointing material over time

Common Drainage Issues

  • Blocked or poorly positioned drains
  • Incorrect patio gradient
  • Compacted soil beneath paving
  • Overgrown surrounding vegetation

Drainage Improvement Considerations

Issue Impact on Patio Recommended Action
Standing water Algae growth Regrading or channel clearing
Slow runoff Staining and dampness Drain cleaning or adjustment
Saturated sub-base Movement of slabs Structural correction
Without addressing drainage, even the best cleaning results will not last as long as expected.

Joint Cleaning and Re-Sanding in Stone Patios

The joints between paving slabs play a major role in both appearance and stability. Over time, they collect dirt, weeds, and organic matter, which can affect the overall finish of the patio.

Why Joint Cleaning Matters

  • Prevents weed regrowth
  • Improves structural stability
  • Enhances overall visual uniformity
  • Reduces water retention between slabs

Joint Cleaning Process

  • Weed and debris removal
  • Low-pressure rinsing to clear buildup
  • Application of appropriate jointing material
  • Compacting for stability

Re-Sanding or Re-Jointing Table

Joint Condition Recommended Action Outcome
Slight erosion Top-up sanding Stabilised joints
Moderate loss Full re-sand Restored structure
Severe damage Re-jointing required Full restoration
Proper joint maintenance ensures that the cleaned surface remains stable and visually consistent over time.

Colour Restoration in Natural Stone

One of the most noticeable changes after professional cleaning is the restoration of the stone’s natural colour. Over time, dirt, algae, and environmental pollutants dull the surface, masking its original appearance.

Why Colour Fades Over Time

  • Layered dirt accumulation
  • Organic growth coverage
  • UV exposure altering surface tone
  • Moisture absorption affecting colour depth

Enhancing Natural Stone Appearance

Technique Effect on Stone Appearance
Steam cleaning Reveals natural variation
Controlled washing Removes surface dullness
Neutral treatments Restores original tone
Careful drying Prevents patchy appearance
A properly cleaned stone patio often looks significantly lighter and more defined once restored, as hidden natural patterns become visible again.

Managing Sensitive or Decorative Stone Finishes

Some patios are made from decorative or high-end stone materials that require a more refined approach.

Examples of Sensitive Finishes

  • Honed limestone
  • Polished sandstone
  • Decorative riven slate
  • Mixed aggregate designs

Special Handling Requirements

  • Reduced pressure levels
  • Increased reliance on steam cleaning
  • Minimal chemical usage
  • Careful attention to surface texture
Even slight over-cleaning can alter the appearance of these surfaces, so precision is essential.

Impact of Foot Traffic Patterns on Cleaning Results

Foot traffic plays a subtle but important role in how stone patios age and how they should be cleaned.

High-Traffic Zones

  • Garden entrances
  • Patio seating areas
  • BBQ or cooking zones
  • Walkways between structures
These areas typically require deeper cleaning due to:
  • Oil and food spills
  • Repeated compaction of dirt
  • Faster wear of protective layers

Traffic-Based Cleaning Strategy

Area Type Cleaning Intensity
Low traffic Standard cleaning
Medium traffic Enhanced treatment
High traffic Deep restoration
Understanding traffic patterns helps ensure cleaning effort is focused where it is needed most.

Long-Term Structural Considerations After Cleaning

Cleaning a stone patio is not only about appearance. It also reveals underlying structural conditions that may need attention.

Common Structural Issues Revealed

  • Loose or rocking slabs
  • Cracked stones
  • Failing joint material
  • Uneven settling of base layers

Maintenance Priorities After Cleaning

  • Repairing unstable slabs
  • Re-leveling affected areas
  • Replacing damaged stones
  • Strengthening joints
Addressing these issues early prevents further deterioration and maintains the integrity of the patio.

Professional Equipment Calibration and Its Importance

The effectiveness of patio cleaning depends heavily on equipment calibration. Even high-end systems can cause damage if not properly adjusted for the surface type.

Key Calibration Factors

  • Water pressure settings
  • Steam temperature control
  • Nozzle type and spray pattern
  • Distance from surface during cleaning

Why Calibration Matters

Incorrect settings can lead to:
  • Surface etching
  • Loss of natural texture
  • Uneven cleaning patterns
  • Damage to joints or edges
At Pureseal Services, calibration is adjusted for each individual project rather than using a standard setting, ensuring consistent and safe results.

The Role of Experience in Achieving Consistent Results

Stone patio cleaning is not purely technical; it also relies heavily on operator experience. Understanding how different stones react in real time allows for adjustments that protect the surface while still achieving a deep clean.

Experienced-Based Adjustments Include

  • Reducing pressure on fragile areas mid-clean
  • Switching methods based on surface response
  • Identifying hidden contamination layers
  • Adjusting dwell times for chemical treatments
This level of judgement cannot be replicated by basic equipment alone.

Final Surface Presentation Standards in High-End Cleaning

Once all cleaning, restoration, and finishing work is complete, the final appearance of the patio should meet a consistent standard.

Expected High-End Results

  • Uniform colour across all stone sections
  • No visible algae or organic staining
  • Clean, well-defined joints
  • Restored natural texture without erosion
  • Balanced, non-patchy drying finish
A well-executed clean should make the patio look naturally refreshed rather than artificially altered, preserving the character of the stone while improving its overall condition.

Ongoing Performance Expectations After Professional Cleaning

After a full professional clean, a stone patio should perform better in terms of both appearance and maintenance.

Post-Clean Benefits

  • Slower regrowth of algae and moss
  • Easier routine maintenance
  • Reduced staining from organic matter
  • Improved water runoff behaviour
  • Enhanced visual consistency throughout the year
These improvements are long-lasting when combined with sensible upkeep and periodic maintenance, ensuring the patio continues to look well cared for without requiring constant intensive cleaning.

Final Conclusion on Cleaning Stone Patios the Right Way

Cleaning a stone patio properly is not a single task, but a layered process that combines surface understanding, material knowledge, controlled cleaning methods, and careful finishing. What often looks like a simple outdoor cleaning job is, in reality, a detailed restoration exercise that directly affects both the appearance and longevity of the stone. The key takeaway is that natural stone behaves very differently from manufactured paving. It is porous, reactive, and highly sensitive to both moisture and cleaning intensity. That means there is no universal approach that works across every patio. Each surface needs to be assessed individually, with methods adapted based on stone type, age, level of contamination, drainage conditions, and exposure to weather. Without this level of consideration, cleaning results tend to be inconsistent, short-lived, or in some cases damaging. A properly executed clean always begins long before any equipment is switched on. Inspection and preparation set the foundation for everything that follows. Identifying issues such as algae growth, oil staining, black spotting, or efflorescence helps determine the right combination of treatments. Skipping this stage or rushing through it usually leads to surface imbalance, where some areas look clean while others retain visible staining or shadowing. The actual cleaning process itself is equally dependent on control rather than force. High pressure alone is rarely the correct answer for natural stone. While it can remove surface dirt quickly, it also carries the risk of eroding the stone’s texture, weakening joints, and creating long-term visual inconsistencies. A more refined approach, combining controlled pressure, steam application, and targeted pre-treatment, produces a far more stable and even result. One of the most important aspects of professional patio cleaning is understanding that removal is only part of the outcome. The goal is not just to eliminate visible dirt or organic growth, but to restore the natural appearance of the stone while preserving its structure. This is where finishing work becomes critical. Issues such as ghost staining, uneven drying, or residue build-up can all undermine the final appearance if not properly addressed. Careful rinsing, neutralisation where needed, and attention to detail during the final inspection ensure the surface is left in a consistent condition. Drainage and environmental conditions also play a major role in how successful a clean will be in the long term. A patio that repeatedly holds moisture will always be more prone to algae and moss regrowth, regardless of how thoroughly it has been cleaned. Similarly, shaded or poorly ventilated areas naturally retain more organic growth. Understanding these external factors is important because it helps explain why some patios deteriorate faster than others and why maintenance strategies need to be tailored rather than generic. Another key consideration is the long-term behaviour of the stone itself. Once cleaned, natural stone tends to reveal its original colour and texture more clearly, which can be a significant visual improvement. However, this also means that any inconsistencies in cleaning become more noticeable. Patchy results, uneven pressure marks, or incomplete treatment of stains can stand out more after drying than they did during the cleaning process. This is why consistency across the entire surface is essential, not just in isolated sections. Professional cleaning also plays an important role in extending the lifespan of a patio. Organic build-up, trapped moisture, and surface contamination can all contribute to gradual degradation if left untreated. By removing these elements correctly, the stone is not only improved visually but also protected from long-term wear. Joint stability is preserved, surface erosion is reduced, and the overall structure remains in better condition for longer. In high-quality work, the difference is often found in the details that are not immediately visible. Controlled calibration of equipment, correct selection of cleaning agents, careful adjustment of pressure levels, and patience during dwell times all contribute to the final result. These factors are easy to overlook, but they determine whether the clean is superficial or genuinely restorative. At a professional level, services such as Pureseal Services approach stone patio cleaning as a specialist craft rather than a routine task. The emphasis is on delivering a balanced result where the stone is cleaned thoroughly but also treated with care, ensuring the natural character of the material is preserved rather than stripped away. This approach recognises that every patio is slightly different and requires its own method rather than a fixed formula. Ultimately, achieving the best possible outcome comes down to respecting the material and working with its natural properties rather than against them. Stone patios are designed to last for many years, but their appearance depends heavily on how they are maintained. With the right combination of assessment, technique, and finishing, even heavily weathered surfaces can be brought back to a clean, natural, and visually balanced condition that reflects the quality of the material beneath.

Continue Reading

Why Chewing Gum Removal from Pavements Matters

Why Chewing Gum Removal from Pavements Matters

Chewing gum is one of the most stubborn and unsightly forms of surface contamination found on pavements across the UK. Once discarded, it quickly hardens and bonds to the surface, creating blackened, sticky marks that are extremely difficult to remove without the right methods. Over time, these marks accumulate and can significantly reduce the visual appeal of public walkways, commercial premises, and residential areas. Beyond aesthetics, gum build-up can also contribute to hygiene concerns and make surfaces appear neglected. At Pureseal Services, the focus is on delivering a high-end, thorough cleaning process that restores pavements to a clean, uniform finish without causing damage to the underlying surface.

Understanding Why Chewing Gum Is Difficult to Remove

Before looking at removal techniques, it helps to understand why chewing gum is so challenging to deal with.

Composition of Chewing Gum

Modern chewing gum is made from synthetic rubber, resins, and waxes. These components give it durability and elasticity, which also make it resistant to weathering.

How It Bonds to Pavements

  • Heat from sunlight softens gum, allowing it to sink into pores
  • Foot traffic presses it deeper into the surface
  • Over time, dirt embeds into the gum, turning it dark and hardened

Impact of Different Surfaces

Surface Type Difficulty Level Reason
Concrete High Porous and absorbs residue
Tarmac Very High Soft surface traps gum deeply
Natural Stone Medium Depends on porosity
Block Paving Medium-High Joints and gaps trap gum

Common Methods for Removing Chewing Gum

There are several methods available, but not all are equally effective or suitable for every surface.

Manual Scraping

This is the most basic method and involves physically removing gum using tools.

Pros

  • Low cost
  • Immediate results for fresh gum

Cons

  • Labour-intensive
  • Leaves residue behind
  • Can damage surfaces if done incorrectly

Cold Treatment (Freezing Method)

Freezing the gum makes it brittle so it can be chipped away.

How It Works

  • Apply a freezing spray
  • Gum hardens rapidly
  • Remove using a scraper

Limitations

  • Works best on small areas
  • Less effective on older, embedded gum
  • Time-consuming for large spaces

Chemical Removal

Specialist chemicals are used to break down the gum.

Advantages

  • Effective on older gum
  • Reduces physical effort

Drawbacks

  • Requires careful handling
  • May leave residue if not rinsed properly
  • Not suitable for all surfaces

Hot Water Pressure Washing

One of the most effective methods for large-scale gum removal.

Key Benefits

  • Softens gum for easy removal
  • Cleans surrounding surface at the same time
  • Efficient for large areas

Important Considerations

  • Requires correct pressure settings
  • Must be combined with proper technique
  • Risk of surface damage if misused

Professional Gum Removal Techniques

Professional services use a combination of methods to achieve the best results. At Pureseal Services, gum removal is approached as a specialist task rather than a simple cleaning job.

Steam Cleaning Technology

Steam cleaning is widely regarded as the most effective solution for removing chewing gum from pavements.

How It Works

  • High-temperature steam softens the gum
  • Low pressure prevents surface damage
  • Gum is lifted cleanly from the surface

Benefits

  • Minimal chemical use
  • Safe for most surfaces
  • Leaves no residue

Combined Treatment Approach

In many cases, a single method is not enough.
Stage Method Used Purpose
1 Pre-treatment Loosens hardened gum
2 Steam or hot wash Removes bulk material
3 Spot treatment Targets remaining residue
4 Final rinse Ensures clean finish
This layered approach ensures that even heavily contaminated areas are restored effectively.

Equipment Used in Professional Gum Removal

High-quality equipment plays a major role in achieving consistent results.

Key Equipment Types

Equipment Function
Steam Cleaner Softens and lifts gum
Pressure Washer Removes debris and residue
Surface Cleaner Ensures even cleaning
Scrapers and Tools Removes stubborn spots
Chemical Applicators Applies targeted treatments
At Pureseal Services, commercial-grade systems are used to ensure efficiency and precision across all types of pavement.

Step-by-Step Process for Removing Chewing Gum

A structured process ensures thorough and consistent results.

Initial Assessment

  • Identify the extent of gum contamination
  • Assess surface type and condition
  • Determine appropriate cleaning method

Preparation

  • Clear loose debris
  • Protect surrounding areas if necessary
  • Prepare equipment and treatments

Gum Removal

  • Apply chosen method (steam, chemical, or combination)
  • Work systematically across the surface
  • Focus on high-traffic areas

Residue Treatment

  • Address any remaining marks
  • Apply additional treatments if required

Final Cleaning

  • Rinse the entire area
  • Ensure a uniform finish
  • Inspect for missed spots

Cost Considerations for Gum Removal Services

Professional gum removal is a specialised service, particularly when carried out to a high standard.

Typical UK Pricing

Area Size (m²) Estimated Cost (£)
10–30 m² £150 – £350
30–80 m² £350 – £900
80–150 m² £900 – £2,000
At the premium end, pricing reflects:
  • Specialist equipment
  • Time-intensive processes
  • Attention to detail
  • Long-lasting results
Pureseal Services operates at this higher level, focusing on quality and durability rather than low-cost, quick fixes.

Factors That Affect Gum Removal Difficulty

Not all jobs are equal, and several factors influence the level of effort required.

Key Influencing Factors

Factor Impact
Age of gum Older gum is harder to remove
Surface type Porous surfaces trap gum
Weather exposure Sun and rain affect bonding
Foot traffic Presses gum deeper into surface
Understanding these factors helps determine the most effective approach.

Preventing Future Gum Build-Up

While removal is important, prevention can reduce long-term maintenance needs.

Practical Measures

  • Regular cleaning schedules
  • Public awareness signage
  • Strategic placement of bins
  • Protective coatings on surfaces

Environmental Considerations

Gum removal should be carried out responsibly.

Responsible Practices

  • Minimise chemical use
  • Use biodegradable solutions where possible
  • Manage wastewater properly
At Pureseal Services, environmentally conscious methods are integrated into the cleaning process wherever possible.

Comparing DIY vs Professional Gum Removal

Aspect DIY Approach Professional Service
Effectiveness Limited High
Time Required Very high Efficient
Equipment Quality Basic Commercial-grade
Surface Safety Risk of damage Controlled and safe
Final Appearance Inconsistent Uniform and clean
DIY methods can work for small, fresh spots, but they rarely achieve the same level of finish as professional services.

Health and Safety Considerations

Removing chewing gum involves equipment and substances that require careful handling.

Key Safety Points

  • Use protective clothing
  • Handle hot equipment with care
  • Follow chemical safety guidelines
  • Be aware of slip hazards during cleaning
Professional services ensure these risks are managed effectively.

Maintaining Clean Pavements After Gum Removal

Once pavements have been restored, ongoing maintenance helps keep them in good condition.

Maintenance Practices

  • Regular inspections
  • Prompt removal of new gum
  • Periodic deep cleaning
  • Keeping surrounding areas tidy

Why Quality Matters in Gum Removal

The difference between a basic clean and a professional finish is significant. Poorly executed gum removal can leave shadows, residue, or even damage the surface, making the area look worse over time. A high-quality service ensures:
  • Complete removal of gum and residue
  • Even, consistent surface appearance
  • Protection of the underlying material
  • Longer-lasting cleanliness
At Pureseal Services, the emphasis is on delivering results that meet a higher standard, ensuring pavements are not only clean but properly restored.

Deep Cleaning Challenges in High-Traffic Urban Areas

Pavements in busy town centres, transport hubs, and retail areas tend to suffer the worst levels of chewing gum build-up. In these environments, gum is often dropped repeatedly in the same locations, creating dense clusters that are far more difficult to remove than isolated spots. Over time, these build-ups form dark patches that become almost “burned in” visually, even after surface cleaning. This happens because layers of gum accumulate on top of one another, trapping dirt and creating a hardened composite layer.

Why High-Traffic Areas Are More Difficult

  • Constant re-soiling in the same locations
  • Higher levels of foot traffic pressing gum deeper into surfaces
  • Greater exposure to oils, dirt, and weathering
  • Limited downtime for cleaning operations
Environment Type Gum Density Removal Difficulty Recommended Method
Quiet residential area Low Moderate Steam cleaning
Town centre streets High Very high Steam + pre-treatment
Transport hubs Very high Extreme Multi-stage system
Retail forecourts Medium-high High Hot wash + spot treatment
In these environments, a simple one-pass cleaning approach is rarely effective. Instead, a structured and repeated process is required to fully restore the surface.

The Role of Heat in Effective Gum Removal

Heat is one of the most important factors in professional chewing gum removal. When applied correctly, it changes the physical properties of the gum, making it significantly easier to remove without damaging the surface underneath.

How Heat Breaks Down Chewing Gum

Chewing gum becomes more pliable when heated. This allows it to:
  • Release its bond with the pavement surface
  • Soften enough to be lifted rather than scraped
  • Break down embedded dirt layers
Steam cleaning is particularly effective because it combines heat with moisture, allowing the gum to loosen without excessive pressure.

Controlled Temperature Application

Temperature Range Effect on Gum Surface Risk Level
Low (below 60°C) Minimal softening Very low
Medium (60–90°C) Moderate softening Low
High (90–120°C) Rapid breakdown Controlled risk
Extreme (120°C+) Full softening + lift Requires expertise
At Pureseal Services, temperature control is carefully managed to ensure gum is removed efficiently while preserving the integrity of the pavement surface.

Surface-Specific Techniques for Gum Removal

Different pavement materials respond differently to heat, pressure, and chemicals. A tailored approach is essential for achieving consistent results.

Concrete Pavements

Concrete is durable but porous, meaning gum can seep into small surface voids.
  • Steam cleaning is highly effective
  • Pre-treatment helps lift embedded residue
  • Pressure must be controlled to avoid surface etching
Concrete often benefits from a second pass cleaning to remove any shadowing left behind after initial gum removal.

Tarmac Surfaces

Tarmac presents one of the biggest challenges.
  • Soft surface can be damaged by high pressure
  • Gum bonds deeply due to surface texture
  • Heat must be carefully controlled
In many cases, a combination of steam and low-pressure rinsing is used to avoid disturbing the aggregate structure.

Block Paving

Block paving is common in commercial and residential areas, but its jointed structure creates additional challenges.
  • Gum can lodge in joints between blocks
  • Sand loss may occur during cleaning
  • Uneven surfaces require careful technique
Issue Cause Solution
Joint contamination Gum pressed into gaps Targeted steam application
Sand displacement Pressure washing too strong Re-sanding after cleaning
Uneven finish Inconsistent cleaning pattern Surface cleaner use

Natural Stone

Natural stone requires the most delicate approach.
  • Sensitive to aggressive chemicals
  • Surface colour can be altered by harsh treatment
  • Steam preferred over high-pressure systems
Preserving the natural appearance is a key priority, especially in heritage or high-end commercial environments.

Chemical Support in Gum Removal

Although heat-based systems are often the primary method, specialist chemicals still play an important supporting role in certain situations.

Types of Chemical Treatments

  • Emulsifying agents to break down residue
  • Degreasers for contaminated gum patches
  • Surface-safe solvents for stubborn deposits

When Chemicals Are Used

Scenario Chemical Use Required? Reason
Fresh gum No Heat alone is sufficient
Aged, hardened gum Yes Requires breakdown first
Oil-contaminated gum Yes Combined contamination
Sensitive surfaces Limited Must be carefully controlled
Chemicals are never used as a standalone solution in high-quality gum removal. Instead, they complement mechanical and thermal processes to achieve a complete clean.

Large-Scale Gum Removal Projects

When dealing with extensive areas such as shopping centres, school grounds, or transport facilities, planning becomes just as important as the cleaning itself.

Key Planning Considerations

  • Access restrictions and working hours
  • Public safety management
  • Section-by-section cleaning strategy
  • Wastewater control
Large-scale projects are typically completed in phases to minimise disruption and ensure consistent quality across the entire site.

Example Project Breakdown

Phase Area Covered Method Used Duration
1 Entrances Steam + pre-treatment 1 day
2 Main walkways Hot water system 2–3 days
3 Seating areas Spot cleaning 1 day
4 Final detailing Inspection + touch-up 1 day

Hidden Damage Caused by Neglected Gum Build-Up

While chewing gum is often seen as purely a cosmetic issue, long-term build-up can actually contribute to surface deterioration.

How Gum Causes Long-Term Issues

  • Traps moisture against the surface
  • Encourages algae and moss growth
  • Creates uneven wear patterns under foot traffic
  • Leads to staining that becomes permanent if untreated
In extreme cases, the surrounding pavement can become more damaged than the gum itself due to prolonged neglect.

Post-Cleaning Surface Restoration

After gum removal, the pavement often requires additional finishing work to restore its original appearance fully.

Common Restoration Steps

  • Final steam pass to remove faint shadows
  • Light pressure rinse for uniform finish
  • Joint re-sanding where required
  • Surface inspection under different lighting conditions
This final stage is crucial in achieving a consistent, professional-grade result rather than a patchy or uneven appearance.

Long-Term Cost Benefits of Professional Gum Removal

Although professional cleaning represents a higher upfront investment, it offers significant long-term savings.

Cost Comparison Over Time

Approach Short-Term Cost Long-Term Cost Surface Condition
DIY cleaning Low High (repeated attempts) Inconsistent
Basic contractor Medium Medium-high Variable
Professional service Higher upfront Lower overall Consistently clean
At the premium end, services delivered by Pureseal Services focus on quality, efficiency, and durability, which reduces the need for repeated treatments and helps maintain surface integrity over time.

Operational Efficiency in Professional Cleaning

Efficiency is not just about speed. It is about achieving the best possible result in the shortest time without compromising quality.

Key Efficiency Factors

  • Correct method selection from the start
  • Proper sequencing of cleaning stages
  • Skilled operators familiar with surface behaviour
  • Use of commercial-grade equipment
This combination ensures that even heavily contaminated pavements can be restored with minimal disruption and maximum effectiveness.

Managing Public Access During Cleaning

In many environments, gum removal must be carried out while maintaining public access or minimising disruption.

Control Measures

  • Sectioned working zones
  • Temporary barriers
  • Clear drying indicators
  • Controlled reopening of cleaned areas
This ensures safety while allowing businesses and public spaces to continue functioning as normally as possible.

Why Consistency Matters in Pavement Cleaning

One of the most important aspects of professional gum removal is achieving a uniform finish across the entire area. Even small inconsistencies can become highly visible once the surface dries.

Causes of Inconsistent Results

  • Uneven heat application
  • Missed gum spots
  • Incomplete rinsing
  • Varying pressure levels during cleaning
Maintaining consistency requires experience, attention to detail, and a methodical approach throughout the entire process.

Final Surface Appearance and Quality Standards

The ultimate goal of chewing gum removal is not just to remove visible gum, but to restore the pavement to a clean, even, and well-maintained condition. A high-quality finish should leave:
  • No visible gum residue
  • No shadowing or staining
  • Even colour across the surface
  • Clean joints and edges
  • A uniform overall appearance
This level of finish is what distinguishes a standard clean from a professional restoration carried out to a high specification by Pureseal Services.

Final Conclusion on Professional Chewing Gum Removal from Pavements

Chewing gum on pavements is one of those problems that looks minor at first glance but quickly builds into something far more disruptive. What starts as a few isolated spots can, over time, turn into widespread staining that affects the overall appearance of streets, commercial entrances, public walkways, and high-footfall areas. Because gum is designed to be durable, flexible, and resistant to weathering, it behaves very differently from ordinary surface dirt. Once it bonds to a pavement, especially under heat and foot traffic, it becomes part of the surface in a way that simple cleaning methods cannot fully reverse. This is why proper removal is not a quick task or a surface-level wash. It is a controlled, structured process that relies on understanding the material being removed, the type of surface underneath, and the environmental conditions that have contributed to the build-up. Every pavement tells a slightly different story. Some are affected by years of gradual accumulation, while others suffer from concentrated areas of heavy contamination in busy zones. Treating all of these with the same approach almost always leads to inconsistent results. One of the key lessons from professional gum removal work is that surface restoration is just as important as removal itself. Getting the gum off is only part of the job. What remains behind, such as ghost staining, surface shadowing, or embedded residue, can still affect the visual quality of the pavement long after the gum has physically been removed. This is where experience and technique matter. The difference between a basic clean and a properly restored surface often comes down to the finishing stages, where attention is given to uniformity, surface balance, and overall appearance. It is also clear that method selection plays a major role in outcomes. Heat-based systems, particularly steam cleaning, have become one of the most effective solutions because they allow gum to be softened and lifted without relying on excessive force. When used correctly, this reduces the risk of surface damage while achieving a deeper level of cleaning. However, even steam alone is rarely enough in heavily contaminated areas. A layered approach that combines pre-treatment, controlled heat application, targeted spot removal, and final rinsing produces far more consistent results than any single method used in isolation. Surface type is another major factor that influences the entire process. Concrete, tarmac, block paving, and natural stone all respond differently to both contamination and cleaning techniques. Porosity, texture, and age of the surface all affect how deeply gum can bond and how easily it can be removed. Older surfaces, in particular, often require more careful handling, not because they are less durable in a structural sense, but because their worn texture tends to trap contaminants more easily. Adjusting methods to suit these differences is essential if the goal is to restore the surface without causing additional wear. Environmental conditions also cannot be ignored. Temperature, moisture levels, and even seasonal changes influence how gum behaves and how effectively it can be removed. Warmer conditions tend to make gum softer and more adhesive, while colder weather can make it brittle but still firmly bonded within surface pores. These variations mean that timing and method selection often need to be adapted rather than fixed, especially in outdoor environments where conditions are constantly changing. Another important aspect is the long-term impact of maintenance or neglect. Pavements that are regularly maintained tend to respond far better to gum removal, with quicker results and fewer residual marks. On the other hand, surfaces that have been neglected for years often require significantly more intensive treatment. In these cases, gum is not just sitting on the surface but has effectively become part of it, requiring multiple stages of cleaning to fully reverse the damage. This is where structured, professional intervention becomes particularly valuable. From a broader perspective, the quality of gum removal has a direct impact on how spaces are perceived. Clean, well-maintained pavements contribute to a sense of order, care, and professionalism in both public and commercial environments. They influence how people experience an area, even if they do not consciously notice the detail. Dirty or heavily stained walkways can have the opposite effect, suggesting neglect even when the surrounding environment is well managed. This makes pavement maintenance more than just a cleaning task; it becomes part of overall site presentation and reputation. There is also a practical benefit that often gets overlooked, which is the prevention of further deterioration. While chewing gum itself is not structurally damaging in the short term, the conditions that allow it to accumulate often contribute to other issues such as dirt build-up, algae growth, and moisture retention. Over time, this combination can accelerate surface wear and make future maintenance more difficult and costly. Removing gum properly, and maintaining a clean surface afterwards, helps reduce these risks and preserves the integrity of the pavement for longer. At a professional level, consistency is what ultimately defines success. Whether working on a small section outside a shopfront or a large-scale public area, the expectation is the same: a uniform, clean finish with no visible remnants of contamination. Achieving this requires more than just equipment. It depends on methodical working practices, attention to detail, and the ability to adapt techniques to suit each specific situation. This is where services such as Pureseal Services operate at a higher standard, focusing not just on removal but on full surface restoration, ensuring pavements are returned to a condition that looks clean, balanced, and properly maintained. When all of these factors are considered together, it becomes clear that chewing gum removal is a specialist process rather than a routine cleaning task. It involves technical understanding, careful execution, and a structured approach that prioritises both surface safety and visual quality. From initial assessment through to final rinse and inspection, every stage contributes to the end result. And in many cases, the quality of that final result is determined long before the cleaning equipment is even switched on, through planning, preparation, and method selection. Ultimately, achieving a high-quality finish is about respect for the surface as much as it is about removing the contamination itself. Pavements are part of the built environment that people interact with every day, and maintaining them properly ensures they continue to serve that role effectively, safely, and with a clean, professional appearance.

Continue Reading

How to Clean Driveways Before Sealing

Why Proper Driveway Cleaning Matters Before Sealing

Cleaning a driveway before sealing is not just a cosmetic step. It directly affects how well the sealant bonds, how long it lasts, and how the finished surface looks. Skipping or rushing this stage can lead to peeling sealant, trapped dirt, and uneven finishes that reduce both durability and appearance. At Pureseal Cleaning the approach is always thorough and methodical. A properly cleaned driveway ensures that any sealing work delivers a long-lasting, high-quality finish rather than a temporary improvement. Driveways in the UK face constant exposure to rain, moss growth, vehicle oils, and general grime. Over time, these elements embed themselves into the surface, making simple washing ineffective. Proper preparation requires a combination of techniques tailored to the material.

Understanding Different Driveway Surfaces

Before cleaning begins, it is essential to identify the driveway material. Each type reacts differently to pressure, chemicals, and moisture.

Block Paving

Block paving is one of the most common driveway surfaces. It is prone to weed growth and joint sand erosion.
  • Requires careful pressure washing to avoid disturbing the joints
  • Often needs re-sanding after cleaning
  • Susceptible to staining from oil and algae

Concrete

Concrete is durable but porous, meaning it absorbs stains easily.
  • Oil stains penetrate deeply
  • High-pressure cleaning is effective but must be controlled
  • May require chemical pre-treatment

Tarmac

Tarmac is softer than concrete and can be damaged easily.
  • Lower pressure washing is required
  • Avoid harsh chemicals
  • Oil stains can be difficult to fully remove

Natural Stone

Natural stone driveways are premium surfaces that need careful handling.
  • Sensitive to acidic cleaners
  • Requires specialised treatments
  • Cleaning must preserve natural colour and texture

Equipment Needed for Effective Driveway Cleaning

Professional driveway cleaning is not just about using a pressure washer. The right combination of tools ensures a deeper and more even clean.

Essential Tools and Equipment

Equipment Type Purpose Notes
Pressure Washer Removes dirt, moss, and debris Adjustable pressure is key
Surface Cleaner Attachment Ensures even cleaning across large areas Prevents streaking
Stiff Brushes Agitates stubborn stains Useful for pre-treatment
Chemical Cleaners Breaks down oil, algae, and grime Must match surface type
Weed Removal Tools Clears growth between joints Essential for block paving
Sand (Kiln-Dried) Re-fills joints after cleaning Required before sealing
At Pureseal Cleaning, commercial-grade equipment is used to achieve consistent results across all driveway types.

Step-by-Step Process to Clean a Driveway Before Sealing

Cleaning a driveway properly involves several stages. Each step builds on the previous one to ensure the surface is fully prepared.

Initial Inspection

Before any cleaning begins, a full inspection is carried out.
  • Identify stains (oil, tyre marks, algae)
  • Check for cracks or damage
  • Assess drainage and slope
  • Determine appropriate cleaning method
This step ensures that the cleaning process is tailored rather than generic.

Clearing the Surface

Remove all loose debris from the driveway.
  • Sweep away leaves, dirt, and dust
  • Remove weeds manually or with tools
  • Clear edges and corners thoroughly
This prevents debris from being pushed deeper into the surface during washing.

Pre-Treatment of Stains

Stubborn stains require targeted treatment before pressure washing.

Common Stains and Treatments

Stain Type Cleaning Method Difficulty Level
Oil & Grease Degreaser treatment High
Moss & Algae Biocide or fungicidal wash Medium
Tyre Marks Detergent and agitation Medium
Rust Stains Specialist rust remover High
Allow treatments to sit for the recommended time to break down contaminants effectively.

Pressure Washing

Pressure washing is the core cleaning step, but technique matters more than force.

Key Considerations

  • Use the correct pressure setting for the surface
  • Maintain consistent distance from the surface
  • Work in uniform passes to avoid streaking
  • Avoid directing water into joints excessively
A surface cleaner attachment is often used for larger areas to ensure an even finish.

Rinsing and Residue Removal

After pressure washing, the driveway must be thoroughly rinsed.
  • Remove all cleaning chemicals
  • Wash away loosened debris
  • Ensure no residue remains
Failure to rinse properly can interfere with sealant adhesion.

Drying Time

The driveway must be completely dry before sealing begins.
Weather Condition Approximate Drying Time
Warm and dry 24 hours
Mild conditions 48 hours
Damp or shaded 72 hours or more
Moisture trapped beneath sealant can cause whitening, bubbling, or failure of the coating.

Common Mistakes When Cleaning Driveways

Even with the right tools, mistakes can compromise the final result.

Using Too Much Pressure

Excessive pressure can:
  • Damage the surface
  • Remove jointing sand
  • Cause uneven textures

Skipping Pre-Treatment

Trying to remove stains with pressure alone often fails. Oil and algae require chemical breakdown first.

Not Allowing Enough Drying Time

This is one of the most common issues and leads to poor sealing results.

Uneven Cleaning

Inconsistent pressure or technique can leave visible lines and patches once sealed.

Preparing the Driveway for Sealing

Cleaning is only part of the preparation. The surface must be restored before applying sealant.

Re-Sanding Block Paving

After cleaning, the joints in block paving must be refilled.
  • Use kiln-dried sand
  • Brush evenly across the surface
  • Ensure joints are fully filled
This stabilises the blocks and prevents movement.

Repairing Damage

Any cracks or issues should be addressed before sealing.
  • Fill cracks in concrete
  • Replace damaged blocks
  • Repair edges and borders
Sealing over damage will not fix it and can make it more noticeable.

Cost Considerations for Professional Driveway Cleaning

Professional driveway cleaning is an investment in the longevity of your surface. At the higher end of the market, quality reflects the level of preparation, equipment, and expertise involved.

Typical Price Ranges in the UK

Driveway Size (m²) Cleaning Only (£) Cleaning + Sealing (£)
20–40 m² £150 – £300 £400 – £800
40–80 m² £300 – £600 £800 – £1,500
80–150 m² £600 – £1,200 £1,500 – £3,000
At Pureseal Cleaning, the focus is on delivering a premium finish rather than competing on price. This includes:
  • Thorough multi-stage cleaning
  • High-grade materials
  • Careful preparation and attention to detail

Benefits of Professional Cleaning Before Sealing

While it may be tempting to handle driveway cleaning yourself, professional preparation offers clear advantages.

Deeper Cleaning

Professional equipment removes embedded dirt that domestic tools cannot reach.

Surface Protection

Correct pressure and techniques prevent damage while achieving a thorough clean.

Better Sealing Results

A properly prepared surface allows sealant to bond effectively, increasing durability.

Environmental Considerations

Driveway cleaning must be handled responsibly, particularly when using chemicals.

Responsible Practices

  • Use biodegradable cleaning solutions where possible
  • Prevent runoff into drains
  • Dispose of waste water correctly
At Pureseal Cleaning, environmentally responsible methods are part of the standard approach.

Seasonal Timing for Driveway Cleaning

Timing plays an important role in achieving the best results.

Best Times of Year

Season Suitability Notes
Spring Excellent Ideal for removing winter buildup
Summer Very Good Faster drying times
Autumn Good Prepare before colder months
Winter Poor Moisture and cold affect results
Dry, mild conditions are always preferred for both cleaning and sealing.

How Often Should Driveways Be Cleaned?

Regular maintenance reduces the need for intensive cleaning.

Recommended Frequency

  • Light cleaning: Once per year
  • Deep cleaning: Every 2–3 years
  • Before sealing: Always required
High-traffic driveways or shaded areas may need more frequent attention.

Signs Your Driveway Needs Cleaning Before Sealing

Some indicators are easy to spot and should not be ignored.
  • Visible moss or algae growth
  • Dark staining or oil patches
  • Faded or uneven appearance
  • Weed growth between joints
  • Water pooling instead of draining
Addressing these issues before sealing ensures a smoother, longer-lasting finish.

Safety Considerations During Cleaning

Driveway cleaning involves powerful equipment and chemicals, so safety is essential.

Key Safety Measures

  • Wear protective clothing and footwear
  • Use eye protection when pressure washing
  • Handle chemicals according to instructions
  • Be cautious of slippery surfaces
Professional services ensure these risks are managed properly.

The Role of Expertise in Achieving a High-End Finish

Cleaning a driveway properly is not just about following steps. It requires judgement, experience, and attention to detail. At Pureseal Cleaning, every driveway is treated individually. Factors such as material type, level of contamination, and environmental conditions are all considered before work begins. This level of care is what separates a basic clean from a finish that genuinely enhances the appearance and lifespan of the driveway.

Comparing DIY vs Professional Driveway Cleaning

Factor DIY Cleaning Professional Cleaning
Equipment Quality Domestic grade Commercial grade
Cleaning Depth سطح-level Deep, thorough cleaning
Risk of Damage Higher Controlled and minimised
Time Required High Efficient
Final Finish Variable Consistent and high-quality
While DIY methods can provide a temporary improvement, they rarely match the durability and finish achieved through professional preparation.

Final Preparation Checks Before Sealing

Before sealing begins, a final inspection ensures everything is ready.
  • Surface completely clean and dry
  • No visible stains or residue
  • Joints properly filled (if applicable)
  • Repairs completed
  • Weather conditions suitable
Only when all these conditions are met should sealing proceed, ensuring the best possible outcome.

Preparing Your Driveway for a Lasting, High-Quality Finish

Cleaning a driveway before sealing is far more than a simple wash-down. It is a detailed preparation process that directly determines how well the sealant performs, how long it lasts, and how the finished surface looks over time. Every stage, from the initial inspection through to the final drying period, plays a role in creating a surface that is ready to be sealed properly. What becomes clear throughout this process is that no two driveways are the same. Materials react differently, stains vary in severity, and environmental conditions can significantly affect the outcome. A method that works well on concrete may not be suitable for tarmac, while natural stone requires an entirely different level of care. Understanding these differences is essential if the goal is to achieve a consistent and professional finish. One of the most important takeaways is the impact of thorough cleaning on sealant performance. Sealants are designed to bond with a clean, dry surface. Any remaining dirt, oil, algae, or moisture can weaken that bond, leading to premature failure. This might show up as peeling, patchiness, or discolouration, all of which can undermine the appearance of the driveway and shorten the lifespan of the work. The level of detail involved in proper cleaning is often underestimated. It is not just about removing visible dirt. It includes breaking down oil stains at a chemical level, eliminating organic growth at its root, and ensuring that every part of the surface is evenly treated. Even small oversights, such as uneven pressure washing or insufficient rinsing, can become highly noticeable once the sealant is applied. Drying time is another factor that cannot be rushed. In UK conditions, where damp weather is common, allowing sufficient time for the driveway to fully dry is critical. Moisture trapped beneath a sealant layer can cause a range of issues that are difficult to correct once the process is complete. Taking the time to ensure the surface is completely dry is one of the simplest ways to protect the final result. Attention to detail also extends beyond the main surface. Edges, joints, and surrounding areas all contribute to the overall appearance. A driveway that has been cleaned inconsistently will show variations once sealed, as the coating enhances both colour and texture. Achieving a uniform clean ensures that the finished surface looks cohesive and well-maintained. Another key point is the role of proper preparation in extending the life of the driveway itself. Cleaning removes harmful substances such as moss, algae, and oil that can gradually degrade the surface. By addressing these issues before sealing, the driveway is not only improved visually but also protected structurally. This helps prevent long-term damage and reduces the need for more extensive repairs in the future. The difference between a basic clean and a professional-level preparation becomes particularly noticeable after sealing. A driveway that has been carefully prepared will have a consistent finish, enhanced colour, and a smooth, well-protected surface. In contrast, a poorly prepared driveway may still show stains, uneven patches, or defects beneath the sealant. Choosing a professional approach ensures that each stage is handled correctly. At Pureseal Services, the emphasis is on delivering a premium result by combining the right equipment, appropriate cleaning methods, and a high level of attention to detail. This approach is designed to achieve more than just a clean surface. It ensures that the driveway is fully prepared to receive sealant in a way that maximises both durability and visual appeal. It is also worth recognising that investing in proper cleaning before sealing can reduce long-term costs. While a more thorough service may come at a higher initial price point, it helps avoid issues such as sealant failure, repeated treatments, or ongoing maintenance problems. In this sense, quality preparation is not just about appearance, but also about value over time. Maintenance after cleaning and sealing becomes significantly easier as well. A well-prepared and sealed driveway resists staining, limits weed growth, and is easier to keep clean with routine care. This means that the effort put into proper preparation continues to deliver benefits long after the work is completed. Ultimately, the process of cleaning a driveway before sealing is about creating the right foundation. Every step, from removing debris and treating stains to managing moisture and ensuring even coverage, contributes to the final outcome. When done properly, it allows the sealing stage to perform exactly as intended, enhancing both the look and longevity of the driveway. By approaching driveway cleaning with the level of care and precision it requires, the result is a surface that not only looks refreshed but is properly protected for the future.

Continue Reading

How to Restore Old Patios

How to Restore Old Patios

An old patio can lose its appeal surprisingly quickly. What once looked clean, level and well-finished often becomes dull, stained, slippery or uneven over time. Weather exposure, foot traffic, organic growth and poor drainage all contribute to gradual deterioration. Restoring a patio is not just about making it look better. It is about improving safety, extending lifespan and preventing ongoing damage to the surface beneath. This guide explains how to properly restore old patios, covering cleaning, repairs, re-sanding where applicable, re-pointing, sealing and long-term maintenance.

Understanding Why Patios Deteriorate

Before restoring a patio, it is important to understand what causes it to degrade in the first place. Different materials behave differently, but most patios suffer from similar environmental pressures.

Common causes of patio damage

Cause Effect on patio
Weather exposure Fading, cracking, erosion
Algae and moss growth Slippery surface, dark staining
Freeze-thaw cycles Cracking and surface lifting
Poor drainage Water pooling and damp patches
Dirt build-up Dull, unattractive finish
Joint failure Loose slabs or uneven surface
Most patios do not fail suddenly. They degrade slowly, which is why restoration can often bring them back to an excellent condition if done properly.

Types of Patio Surfaces and Restoration Needs

Different materials require different restoration approaches. A one-method approach does not work for all surfaces.

Common patio types

Patio type Characteristics Restoration considerations
Natural stone Sandstone, limestone, slate Sensitive to harsh chemicals
Concrete slabs Uniform and durable Can handle higher pressure cleaning
Porcelain tiles Non-porous and modern Needs gentle cleaning, prone to scratching
Block paving patios Jointed surface Requires re-sanding after cleaning
Resin-bound surfaces Smooth finish Needs specialist cleaning only
Each surface requires a tailored approach to avoid long-term damage.

Initial Patio Assessment Before Restoration

A proper restoration process always starts with inspection. This helps identify underlying issues rather than just surface-level problems.

What to check during inspection

  • Cracked or broken slabs
  • Loose or rocking sections
  • Weed growth in joints or gaps
  • Surface staining and discolouration
  • Drainage flow and water pooling
  • Joint condition (sand or mortar-based)

Patio condition grading

Condition level Description Restoration requirement
Light wear Minor dirt and fading Basic clean and seal
Moderate wear Moss, stains, minor joint issues Deep clean and re-pointing
Heavy wear Cracks, movement, algae build-up Full restoration required
Severe damage Structural movement or sinking Re-laying sections needed
Understanding the condition helps determine the correct restoration approach and cost level.

Cleaning Old Patios Safely

Cleaning is the foundation of any patio restoration. However, incorrect cleaning methods can cause permanent damage, especially on older or natural stone surfaces.

Safe cleaning methods

Method Best for Risk level
Soft washing Natural stone and porcelain Low
Controlled pressure washing Concrete and block paving Medium
Manual scrubbing Small or delicate areas Low
Chemical treatment Algae and staining Depends on product
The key principle is control rather than force.

Step-by-step cleaning process

Step 1: Dry removal of debris

  • Sweep the entire patio thoroughly
  • Remove leaves, soil and organic matter
  • Clear drainage channels
  • Check for loose material between slabs
This prevents dirt from being pushed deeper during washing.

Step 2: Targeted treatment for stains and algae

Different stains require different treatments.
Issue Treatment type
Algae and moss Biocide treatment
Oil stains Degreaser solution
Rust marks Specialist rust remover
General dirt Mild detergent wash
Allow treatments to dwell before rinsing for best results.

Step 3: Controlled washing

  • Use low to medium pressure only
  • Avoid blasting joints or edges
  • Work in consistent sections
  • Rinse thoroughly to remove residue
High-pressure washing can damage pointing and loosen slabs, especially on older patios.

Re-Pointing and Joint Restoration

Many patios, particularly natural stone and block paving styles, rely on joint material to stay stable. When this fails, the surface becomes weak and uneven.

Types of patio jointing materials

Material Use case Durability
Sand and cement mortar Traditional stone patios High
Resin jointing compounds Modern installations Very high
Kiln-dried sand Block paving patios Medium
Brush-in polymer sand Flexible systems High

When re-pointing is needed

  • Gaps appearing between slabs
  • Loose or rocking paving stones
  • Weed growth in joints
  • Crumbling or missing mortar
  • Water entering below surface layers

Re-pointing process overview

  1. Remove loose or failing joint material
  2. Clean joints thoroughly
  3. Allow surface to dry completely
  4. Apply new jointing material
  5. Compact or tool joints for proper fill
  6. Clean excess material from surface
Re-pointing is one of the most important steps in restoring structural integrity.

Repairing Damaged or Uneven Slabs

Over time, patio slabs can crack, sink or become uneven due to ground movement or poor installation.

Common slab issues

Issue Cause
Cracked slabs Freeze-thaw damage or impact
Sunken areas Sub-base failure
Raised edges Root growth or ground movement
Loose slabs Failed bedding material

Repair process

  • Lift affected slabs carefully
  • Inspect and level sub-base
  • Add or adjust bedding layer
  • Re-seat slabs firmly
  • Re-point or re-sand joints
Correct base preparation is essential to prevent repeat movement.

Dealing with Algae, Moss and Organic Growth

Organic growth is one of the most common issues on older patios, particularly in shaded or damp areas.

Why it grows

  • Constant moisture retention
  • Poor drainage
  • Lack of sunlight
  • Organic debris buildup

Treatment methods comparison

Method Effectiveness Safety
Biocide application High Safe when used correctly
Pressure washing only Medium Can damage joints
Manual scraping Low Labour intensive
Combined treatment approach Very high Best option
A combined treatment approach is often most effective for long-term results.

Patio Sealing and Surface Protection

Sealing is an important step in many patio restorations, particularly for porous materials like natural stone and concrete.

Benefits of sealing

  • Reduces water absorption
  • Slows algae and moss regrowth
  • Enhances colour and finish
  • Makes future cleaning easier
  • Protects against staining

Types of patio sealers

Sealer type Finish Protection level
Natural finish sealer Matte appearance Moderate
Colour-enhancing sealer Deepens stone colour High
Wet-look sealer Glossy finish Very high
Breathable sealer Natural look with protection High
Sealing should always be applied to a fully clean and dry surface for best performance.

Cost of Patio Restoration in the UK

Patio restoration costs vary based on size, condition and level of work required. Heavily damaged patios require more labour, materials and time.

Typical pricing guide

Service type Price range Notes
Basic clean only £150 – £350 Light dirt and algae removal
Clean and re-point £400 – £900 Moderate restoration
Full patio restoration £800 – £2,000+ Deep cleaning, repairs and sealing
Large or complex patios £1,500 – £3,500+ Premium restoration work
Premium restoration services, such as those provided by Pureseal Services, sit at the higher end of the pricing scale due to detailed workmanship, specialist equipment and longer-lasting results.

Long-Term Maintenance After Restoration

Once a patio has been restored, maintenance is key to keeping it in good condition.

Recommended maintenance schedule

Task Frequency
Light sweeping Weekly
Spot cleaning As needed
Algae treatment Every 3–6 months
Joint inspection Twice per year
Full clean Annually
Regular maintenance prevents the need for repeat restoration work.

Common Restoration Mistakes to Avoid

Many patio restoration issues come from incorrect methods or rushing the process.

Frequent mistakes

Mistake Result
Overusing pressure washer Surface erosion and joint damage
Skipping joint repair Structural instability
Sealing dirty surfaces Trapped staining and poor finish
Using wrong chemicals Discolouration or surface damage
Ignoring drainage issues Recurring damp problems
Each stage of restoration builds on the previous one, so skipping steps often leads to poor long-term results.

Drainage and Water Management

Poor drainage is one of the main reasons patios deteriorate early.

Signs of drainage problems

  • Standing water after rain
  • Damp patches that never dry
  • Algae forming in specific areas
  • Soil erosion around edges

Improving patio drainage

Solution Benefit
Re-levelling surface Encourages runoff
Installing drainage channels Directs water away
Clearing existing drains Prevents pooling
Adjusting joint integrity Reduces water penetration
Good drainage extends the lifespan of any restored patio.

Professional Patio Restoration Approach

While smaller patios can sometimes be maintained with DIY methods, full restoration work is often more effective when handled professionally. A professional approach typically includes:
  • Detailed surface assessment
  • Controlled deep cleaning process
  • Specialist stain and algae treatment
  • Structural repairs where needed
  • Re-pointing or re-sanding
  • Application of protective sealers
  • Final finishing for consistent appearance
Pureseal Services focus on high-end patio restoration work with attention to detail, particularly where long-term durability and appearance are priorities rather than quick surface-level improvements.

Advanced Patio Restoration Techniques for Long-Term Results

Once the basic cleaning, repairs and re-pointing have been completed, some patios still need additional restoration work to fully bring them back to a stable, long-lasting condition. This is especially true for older installations, natural stone patios, or areas that have suffered from years of neglect. At this stage, the focus shifts from simply improving appearance to strengthening the structure and preventing future deterioration.

Deep Cleaning vs Surface Cleaning

Not all cleaning is the same. A light surface wash may improve appearance temporarily, but it does little to address embedded contamination within the stone or jointing.

Key differences

Cleaning type What it removes Result longevity
Surface cleaning Loose dirt and dust Short-term improvement
Deep cleaning Embedded algae, stains, oils Long-term restoration
Restoration cleaning Full contamination removal Structural and visual reset
Deep cleaning is particularly important for porous materials like sandstone or limestone, where contaminants can penetrate below the surface.

Steam Cleaning for Delicate Patio Surfaces

Steam cleaning is becoming more common in high-end patio restoration work, especially for natural stone.

Why steam cleaning is effective

  • Uses high-temperature vapour rather than high pressure
  • Breaks down organic growth without abrasion
  • Reduces risk of surface erosion
  • Works well on older, fragile stone

Suitable surfaces

Surface type Steam cleaning suitability
Sandstone High
Limestone High
Slate Medium to high
Concrete Medium
Porcelain Medium (care required)
Steam cleaning is particularly useful where traditional pressure washing would be too aggressive.

Advanced Stain Removal Techniques

Some stains require specialist treatment that goes beyond standard cleaning methods.

Deep stain categories

Stain type Difficulty Treatment approach
Oil and grease High Degreasing + absorption treatment
Rust stains Medium to high Chemical rust removal
Organic tannin stains High Oxidising treatment
Paint spills Very high Mechanical and chemical removal

Oil stain restoration method

Oil stains are one of the most stubborn issues in patio restoration.
  1. Apply specialist degreasing agent
  2. Allow extended dwell time for penetration
  3. Use absorbent compound where necessary
  4. Agitate gently with controlled brushing
  5. Rinse thoroughly and repeat if needed
In older stains, complete removal is not always possible, but significant improvement can usually be achieved.

Structural Re-Leveling of Patio Areas

Over time, patios can sink or become uneven due to soil movement, poor installation or water erosion. Simply cleaning these areas does not solve the underlying problem.

Causes of uneven patios

  • Sub-base settlement
  • Tree root movement
  • Water erosion beneath slabs
  • Poor original compaction
  • Frost heave during winter

Re-levelling process

  1. Lift affected slabs carefully
  2. Inspect sub-base condition
  3. Add or compact new hardcore material
  4. Apply fresh bedding layer
  5. Re-lay slabs at correct level
  6. Re-point joints to secure position

Level variation comparison

Condition Surface effect Action required
Minor dips Slight pooling water Spot correction
Moderate sinking Trip hazards Local re-levelling
Severe movement Widespread unevenness Full section rebuild
Re-levelling is one of the most important structural restoration steps for long-term patio stability.

Joint Reinforcement Options for Patios

Once a patio has been cleaned and re-pointed, reinforcing the joints can significantly extend its lifespan.

Joint reinforcement methods

Method Description Durability
Cement-based pointing Traditional rigid joints High but prone to cracking
Resin jointing Flexible, durable compound Very high
Polymeric sand (for block paving patios) Sets when activated High
Hybrid mortar systems Flexible cement blends High

Why reinforcement matters

  • Reduces weed regrowth
  • Improves resistance to water penetration
  • Helps maintain slab alignment
  • Extends time between maintenance cycles
In premium restoration work, joint reinforcement is often tailored to the specific patio material and exposure conditions.

Colour Restoration for Faded Patios

Many older patios suffer from colour fading, particularly natural stone exposed to years of sunlight and weathering.

Causes of fading

  • UV exposure
  • Acid rain erosion
  • Chemical cleaning overuse
  • Natural mineral breakdown

Colour enhancement methods

Method Effect Longevity
Colour-enhancing sealers Deepens natural tones Medium to long
Stone colour revivers Temporary enhancement Short to medium
Full sealing systems Protects and enhances Long term
Colour restoration does not change the material, but it restores visual depth and improves uniformity across the surface.

Anti-Slip Treatment for Safety Improvement

Old patios often become slippery due to algae, polished surfaces or worn finishes. This can present a safety risk, particularly in wet weather.

Anti-slip improvement methods

  • Deep cleaning to remove surface biofilm
  • Application of anti-slip sealers
  • Surface texturing treatments on concrete
  • Biocide maintenance to prevent regrowth

Slip risk comparison

Surface condition Slip risk level
Clean dry patio Low
Light algae presence Medium
Heavy moss growth High
Wet sealed surface (gloss finish) Medium to high
Anti-slip treatments are often recommended in shaded gardens or areas that do not dry quickly.

Edge Restraint Repairs for Patio Stability

Just like block paving, patio edges play a key role in keeping the structure stable.

Common edge problems

  • Slabs spreading outward
  • Loose perimeter stones
  • Soil washout around edges
  • Broken or missing edging material

Repair approaches

Edge type Repair method
Concrete edging Recasting or patch repair
Stone kerbing Resetting and re-bedding
Resin edging Reapplication or reinforcement
Natural edge finish Soil stabilisation and re-compaction
Edge stability directly affects how long a restored patio will remain level and secure.

Weather Protection Strategies After Restoration

Once a patio has been restored, protecting it from future weather damage is essential.

Seasonal protection considerations

Season Risk factor Preventative action
Winter Freeze-thaw cracking Sealing and drainage checks
Spring Weed growth Early biocide treatment
Summer UV fading Sealing and shade management
Autumn Leaf staining Regular sweeping and clearing

Water protection benefits

  • Reduces absorption into porous stone
  • Slows erosion of joint materials
  • Prevents staining from organic debris
  • Helps maintain consistent surface appearance
Water protection is one of the most important long-term investments in patio maintenance.

Equipment Differences in High-End Restoration Work

The quality of restoration work is heavily influenced by the equipment used. Professional-grade tools allow for more precise, controlled and consistent results.

Equipment comparison

Task Domestic equipment Professional equipment
Cleaning Standard pressure washer Adjustable flow systems
Joint repair Manual trowels Precision jointing tools
Surface drying Natural air drying Forced air systems
Stain removal Household chemicals Specialist restoration compounds
Sealing Basic applicators Controlled spray or roller systems

Pureseal Services operate with higher-end restoration systems that allow for more controlled cleaning and finishing, particularly on delicate or high-value patio surfaces.

Long-Term Restoration Planning

A properly restored patio should not require constant major intervention if maintained correctly. Instead, it should follow a predictable maintenance cycle.

Suggested long-term schedule

Timeframe Action
Monthly Light cleaning and inspection
Every 3 months Algae and moss treatment
Every 6–12 months Deep clean touch-up
Every 2–4 years Re-sealing or re-pointing check
As needed Structural repairs

Common Long-Term Problems After Poor Restoration Work

If restoration is done incorrectly or incomplete, problems often return quickly.

Typical failure points

Issue Cause
Rapid algae return No biocide treatment used
Loose slabs Poor re-bedding or sub-base issues
Patchy appearance Uneven cleaning or sealing
Water pooling Incorrect levelling
Joint breakdown Low-quality pointing materials
This is why full-process restoration is important rather than isolated cleaning steps.

Professional Restoration Approach Overview

High-quality patio restoration is not just a cleaning service. It is a structured process designed to rebuild appearance, stability and longevity at the same time. A full professional restoration approach typically includes:
  • Full inspection and condition grading
  • Deep or steam cleaning depending on surface type
  • Targeted stain and algae removal
  • Structural repairs and slab re-levelling
  • Re-pointing with appropriate jointing materials
  • Optional colour enhancement and sealing
  • Final finishing and surface balancing
Pureseal Services focus on detailed, high-end restoration work that prioritises long-term performance and finish quality rather than quick cosmetic improvement.

Final restoration overview and long-term takeaways

Restoring an old patio is rarely a single-step job. It is a process that builds in layers, starting with cleaning and ending with structural and surface protection work that determines how well the patio holds up over time. When each stage is carried out properly, even heavily weathered patios can be brought back to a condition that looks clean, stable and well-finished. The most important thing to understand is that appearance and structure go hand in hand. A patio can look improved after a basic wash, but if the joints are weak, the slabs are uneven, or drainage is poor, the problems will return quickly. That is why proper restoration always goes deeper than surface cleaning alone.

What makes a restoration successful long term

A well-restored patio typically shares a few key characteristics:
  • The surface is fully cleaned without damaging the material
  • Organic growth has been properly treated at root level
  • Jointing or pointing is structurally sound and evenly applied
  • Slabs are stable with no rocking or movement
  • Water drains away naturally without pooling
  • The surface has been protected where appropriate
When all of these elements are addressed together, the result is not just cosmetic improvement but a properly functioning outdoor surface.

The importance of doing the job in the right order

One of the most common reasons patio restorations fail early is incorrect sequencing. Each stage depends on the one before it being completed properly. For example:
  • Re-pointing before a full clean traps dirt and weakens adhesion
  • Sealing before full drying locks in moisture and stains
  • Skipping sub-base checks leads to recurring movement issues
  • Over-washing before joint repair causes further structural loss
A structured approach avoids these problems and ensures each layer of the patio supports the next.

Long-term performance expectations

Once restored correctly, a patio should not require constant heavy work. Instead, it should move into a maintenance phase where light care keeps it in good condition. Typical long-term expectations include:
  • Cleaner appearance for longer periods between washes
  • Reduced weed and moss growth in joints
  • Improved resistance to staining and water absorption
  • More stable surface under foot traffic
  • Slower deterioration from weather exposure
This is where the real value of restoration shows, as ongoing upkeep becomes simpler and less frequent.

Ongoing care mindset

A restored patio still lives outdoors, so it will always be exposed to the same environmental pressures. The difference is that it starts from a stronger, more stable position. Simple habits make a noticeable difference over time:
  • Keeping the surface clear of leaves and debris
  • Addressing small stains quickly before they set
  • Checking joints and edges periodically
  • Managing drainage so water does not sit for long periods
  • Treating early signs of algae before they spread
These small actions reduce the need for repeat deep restoration work.

Where professional restoration fits in

While smaller patios can sometimes be maintained with basic cleaning, full restoration work is more complex when structural issues, heavy staining or long-term neglect are involved. At that point, precision and equipment make a significant difference to the outcome. High-end restoration services such as those provided by Pureseal Services focus on a complete process rather than isolated fixes. That includes controlled deep cleaning, careful joint restoration, surface protection where appropriate, and attention to drainage and stability issues that are often missed in basic cleaning approaches. This level of work tends to sit at the higher end of the pricing scale, reflecting the time, care and equipment involved, but it is also what helps achieve longer-lasting and more consistent results across the entire patio rather than just improving isolated areas.

What a properly restored patio should feel like in use

Beyond appearance, there is a noticeable difference in how a restored patio performs day to day. The surface should feel firm underfoot, consistent across its entire area and free from movement or instability. Water should behave predictably, running off rather than sitting in patches. Joints should be tight enough to resist weed growth while still allowing the structure to breathe naturally. When all of this comes together, the patio becomes a more usable and reliable part of the outdoor space rather than an ongoing maintenance problem.

Continue Reading

How to Clean Block Paving and Re-Sand It

How to Clean Block Paving and Re-Sand It

Block paving is one of the most popular choices for driveways, patios and paths in the UK. It looks smart when it is properly maintained, but over time it collects dirt, weeds, moss, algae, oil stains and loses the sand between joints. Once the jointing sand starts breaking down, the surface becomes less stable and weeds start to take hold more easily. Cleaning and re-sanding block paving is not just about appearance. It plays a key role in keeping the surface structurally sound, preventing movement between blocks and extending the lifespan of the entire paved area. This guide explains how to clean block paving properly, remove contamination safely and carry out a correct re-sanding process without damaging the surface.

Understanding Block Paving and Why It Needs Maintenance

Block paving is made up of individual bricks laid on a sub-base with sand-filled joints. Those joints are essential because they lock the blocks together and distribute weight evenly. When those joints weaken, the whole surface becomes more vulnerable.

Common issues with block paving over time

Problem Cause Result
Weed growth Loss of joint sand Unstable surface and visual mess
Moss and algae Moisture and shade Slippery and discoloured paving
Oil stains Vehicle leaks Permanent dark patches if untreated
Sinking blocks Poor base or joint loss Uneven surface
Sand loss Weather and washing Loose, shifting paving
Most issues begin gradually, which is why routine cleaning and re-sanding is far more effective than waiting for visible deterioration.

Tools and Equipment Needed for Safe Cleaning

Using the correct tools is essential to avoid damaging the surface or removing too much joint sand unintentionally.

Essential equipment list

Tool Purpose
Stiff outdoor broom Loose debris removal
Pressure washer (controlled use) Deep cleaning surface
Surface cleaner attachment Even cleaning without striping
Weed scraper or knife Removing deep-rooted weeds
Hose with spray nozzle Rinsing and controlled water use
Kiln-dried sand Re-sanding joints
Leaf blower Drying and debris removal

Optional professional-grade equipment

Equipment Benefit
Rotary surface cleaner Even pressure distribution
Low-pressure soft wash system Reduces risk of joint erosion
Industrial vac system Removes loose debris efficiently
Pureseal Services typically use professional-grade systems that reduce damage risk while achieving a deeper, more consistent clean compared to standard domestic pressure washers.

Step-by-Step Cleaning Process for Block Paving

Cleaning block paving properly is about control rather than force. The aim is to remove contamination without destroying the joint structure.

Step 1: Initial surface clearance

Before any water is used, the surface should be cleared of loose debris.
  • Sweep the entire area thoroughly
  • Remove leaves, soil and stones
  • Check for visible weeds and moss growth
  • Clear drains and edges
This prevents debris from being pushed into joints during washing.

Step 2: Pre-treatment of stains and weeds

Some areas need targeted treatment before washing.
Issue Treatment method
Oil stains Specialist degreaser left to dwell
Moss growth Biocide treatment for breakdown
Weeds Manual removal or root treatment
Allow treatments to sit long enough to break down contaminants before rinsing.

Step 3: Pressure washing the surface

This is the most sensitive stage. Too much pressure will remove joint sand and destabilise the paving.

Safe pressure washing approach

  • Use a fan spray, not a pinpoint jet
  • Keep nozzle at least 20–30 cm from surface
  • Work in controlled overlapping sections
  • Avoid blasting directly into joints
  • Maintain consistent movement

Pressure comparison table

Method Effectiveness Risk to joints Recommended
Low-pressure rinse Moderate Low Yes
Standard pressure wash High Medium Careful use
High-pressure jet Very high High Not recommended
The goal is to clean the surface, not excavate the joints.

Step 4: Rinsing and debris removal

Once cleaning is complete, all residue must be removed properly.
  • Rinse from top to bottom
  • Push dirty water towards drainage points
  • Avoid pooling water in low areas
  • Ensure no sludge remains between blocks
Any remaining residue can interfere with re-sanding later.

Dealing with Stubborn Stains

Block paving is often affected by long-term staining that requires extra attention.

Oil and grease stains

Oil is one of the hardest substances to remove from block paving.

Treatment method:

  • Apply degreasing solution
  • Allow time to break down oils
  • Agitate gently with stiff brush
  • Rinse thoroughly
  • Repeat if necessary
Old stains may never fully disappear but can often be significantly reduced.

Algae and moss removal

Algae thrives in damp shaded areas.
Treatment type Effectiveness Safety
Biocide treatment High Safe when used correctly
Pressure washing only Medium Risk of regrowth
Manual scraping Low Labour intensive
Biocide treatments are generally preferred because they treat the root of the problem rather than just the surface.

Drying the Surface Before Re-Sanding

Re-sanding must only be done when the paving is fully dry. Moisture prevents sand from settling properly into joints.

Drying methods

  • Natural air drying (most effective)
  • Leaf blower to remove surface water
  • Light sweeping to expose damp areas

Drying time guide

Weather condition Drying time
Hot and sunny 4–8 hours
Mild cloudy 12–24 hours
Cool damp conditions 24–48 hours
Attempting to re-sand too early will lead to uneven compaction and weak joints.

Choosing the Right Jointing Sand

Not all sand is suitable for block paving joints. The wrong type will wash out quickly or fail to lock blocks in place.

Types of jointing sand

Sand type Description Suitability
Kiln-dried sand Fine, dry and free-flowing Standard use
Polymer-modified sand Hardens when wet High durability areas
Sharp sand Coarse and unstable Not recommended
Building sand Too fine and retains moisture Not suitable
Kiln-dried sand is the most commonly used option for domestic paving due to its balance of performance and affordability.

Re-Sanding Block Paving Properly

Re-sanding is what restores stability to the surface. Without it, block paving will gradually loosen and shift.

Step-by-step re-sanding process

Step 1: Spread dry sand

  • Pour sand over entire surface
  • Ensure even coverage
  • Focus on joints rather than surface build-up

Step 2: Brush sand into joints

  • Use a stiff broom
  • Sweep diagonally across blocks
  • Repeat multiple times to fill gaps

Important point:

The sand must be worked into the joints fully. Surface-level sand does not provide structural support.

Step 3: Compact the surface

Compaction helps the sand settle deeply into joints.
Method Effectiveness
Plate compactor High
Rubber mallet tapping Medium
Walking vibration Low
Professional services typically use compaction equipment to ensure stability and reduce future settlement.

Step 4: Top-up sanding

After compaction, gaps will appear as sand settles.
  • Add more sand
  • Repeat brushing process
  • Ensure all joints are filled

Step 5: Final light misting

A very light water mist can help settle kiln-dried sand.
  • Do not flood the surface
  • Avoid washing sand out
  • Allow natural curing time

Common Mistakes During Cleaning and Re-Sanding

Many issues come from rushing or using incorrect methods.

Mistakes to avoid

Mistake Result
Overusing pressure washer Joint sand loss
Re-sanding on wet surface Weak joint structure
Using wrong sand type Rapid washout
Skipping compaction Loose and shifting blocks
Ignoring weed treatment Fast regrowth
Once joint integrity is lost, the surface becomes much harder to stabilise.

Cost of Block Paving Cleaning and Re-Sanding

Costs vary depending on size, condition and level of contamination. Heavily stained or weed-infested paving takes longer and requires more material.

UK pricing guide

Service type Typical cost range Notes
Basic clean only £150 – £300 Light dirt, minimal staining
Clean and re-sand £250 – £600 Standard residential driveways
Deep restoration clean £400 – £900 Heavy staining or weed infestation
Large driveway projects £700 – £1,500+ Extensive areas or complex layouts
Premium services such as those offered by Pureseal Services sit at the higher end of the market, reflecting detailed cleaning methods, specialist equipment use and a more thorough re-sanding process designed for longer-lasting results.

Maintenance After Cleaning and Re-Sanding

Once block paving has been cleaned and re-sanded, maintenance plays a key role in keeping it in good condition.

Recommended maintenance schedule

Task Frequency
Light sweeping Weekly or bi-weekly
Weed inspection Monthly
Moss treatment Every 3–6 months
Surface wash 1–2 times per year
Re-sanding top-up Every 1–2 years
Consistent upkeep prevents the need for full restoration work later on.

Signs That Block Paving Needs Re-Sanding Again

Even well-maintained surfaces will eventually need attention.

Warning signs

  • Visible gaps between blocks
  • Loose or rocking paving stones
  • Increased weed growth
  • Sand visible on surface instead of between joints
  • Water pooling in uneven areas
These signs usually indicate that joint integrity has weakened.

Professional Cleaning and Restoration Approach

Large-scale or heavily deteriorated block paving often benefits from professional restoration rather than standard DIY cleaning. A professional approach typically includes:
  • Controlled low-pressure cleaning
  • Targeted stain treatment
  • Full removal of contaminated joint material
  • High-quality kiln-dried or polymeric re-sanding
  • Mechanical compaction for stability
  • Final surface finishing for uniform appearance
Pureseal Services focus on detailed restoration work rather than quick surface cleaning, which means the process is more methodical and designed to improve both appearance and structural performance over time.

Advanced Restoration Techniques for Block Paving

Once basic cleaning and re-sanding have been completed, some driveways still need additional restoration work to bring them back to a near-new condition. This is especially common where block paving has been neglected for several years or has been exposed to oil, weeds and heavy vehicle use.

Chemical restoration treatments

Some staining cannot be removed with pressure washing alone. In these cases, targeted chemical treatments are used to break down embedded contamination.

Common restoration treatments

Treatment type Purpose Best use case
Degreasing agents Break down oil and fuel stains Driveways with vehicles
Biocides Kill algae and moss spores Shaded or damp areas
Efflorescence removers Remove white salt deposits New or ageing paving
Rust removers Treat metal contamination Furniture or vehicle rust marks
These treatments must be applied carefully and evenly. Overuse or incorrect dilution can cause patchy results or surface discolouration.

Controlled re-washing after treatment

After chemical treatments have been given time to work, a second controlled wash is often required. Key points during this stage:
  • Use low to medium pressure only
  • Avoid concentrating water in one area
  • Ensure full rinse of all treated zones
  • Work in consistent overlapping passes
The goal is to lift loosened contaminants without disturbing the structure of the jointing sand more than necessary.

Deep Re-Sanding for Structural Stability

Not all re-sanding is the same. In heavily worn block paving, a deeper structural re-sand is often required rather than a surface-level refill.

When deep re-sanding is needed

  • Large gaps between blocks
  • Frequent movement underfoot or vehicles
  • Visible sub-base exposure in joints
  • Persistent weed regrowth
  • Sand completely washed out in sections
In these cases, a full joint reset is often the most effective solution.

Full joint reset process

This is more intensive than standard re-sanding and involves several stages:
  1. Removal of all existing joint sand
  2. Deep cleaning of joint channels
  3. Inspection of block alignment
  4. Re-filling with fresh kiln-dried or polymeric sand
  5. Mechanical compaction
  6. Final surface finishing
This process restores the structural “lock” between blocks, which is what gives block paving its strength under load.

Sand depth comparison

Condition Joint fill level Stability
Fully filled joints 100% High stability
Partial fill 50–70% Medium stability
Minimal sand Under 50% Low stability
Proper joint fill is what prevents lateral movement when vehicles or foot traffic apply pressure.

Preventing Weed Regrowth After Cleaning

Weeds are one of the most frustrating problems with block paving. They rarely grow from the bottom up; instead, they take root in sand-filled joints where moisture and organic debris collect.

Why weeds return

  • Organic matter trapped in joints
  • Insufficient sand compaction
  • Gaps left after cleaning
  • Wind-blown seeds settling in joints
  • Lack of preventative treatment

Prevention methods

Method Effectiveness Duration
Manual removal Low Short-term
Chemical weed killer Medium Moderate
Biocide treatment High Longer-term control
Polymer jointing sand Very high Long-term prevention
Polymeric sand is often used in higher-end restoration work because it binds when activated with water, making it much harder for weeds to establish.

Block Paving Edge Restraints and Why They Matter

One of the most overlooked parts of a driveway is the edge restraint system. Without proper edging, block paving can gradually spread outward over time.

Common edge restraint types

Type Description Durability
Concrete edging Fixed perimeter border High
Resin edge system Flexible binding edge Medium to high
Kerb stones Solid structural boundary Very high
Plastic edging Lightweight restraint Low
If edge restraints fail, even a well-cleaned and re-sanded surface will eventually start to lose shape.

Signs of edge failure

  • Outer blocks moving outward
  • Gaps forming along borders
  • Uneven edges or lifting sections
  • Loss of straight driveway lines
In restoration work, stabilising edges is often just as important as re-sanding the joints.

Seasonal Effects on Block Paving Condition

Weather has a direct impact on how block paving behaves over time. Understanding seasonal influence helps plan cleaning and maintenance more effectively.

Seasonal breakdown

Season Main impact Maintenance focus
Winter Freeze-thaw expansion Check for movement and cracks
Spring Weed germination Early treatment and cleaning
Summer Oil stains and drying shrinkage Deep cleaning and stain removal
Autumn Leaf decay and blockage Gutter and surface clearing
Block paving is most vulnerable during winter and early spring due to moisture cycles and biological growth.

Drainage and Water Flow Considerations

Water management plays a huge role in the long-term condition of block paving. Poor drainage leads to softening of the sub-base, algae growth and joint erosion.

Common drainage problems

  • Standing water after rain
  • Water pooling near edges
  • Slow runoff towards drains
  • Blocked channel drains or gullies

Improving drainage performance

Action Benefit
Clearing drainage channels Prevents overflow
Re-levelling sunken areas Restores proper flow
Re-sanding joints properly Reduces water penetration
Installing additional drainage Long-term water control
In many cases, cleaning alone is not enough if drainage issues are not addressed at the same time.

Equipment Differences: DIY vs Professional Grade

The equipment used has a major impact on both results and surface safety.

Comparison of equipment types

Category DIY equipment Professional equipment
Pressure washing Domestic washer Controlled flow system
Sand application Manual sweeping Precision spreading tools
Compaction Hand tools Plate compactors
Stain treatment Basic cleaners Specialist formulations
Water control Standard hose Adjustable flow systems
Professional systems are designed to clean deeply without compromising the integrity of the joint structure. Pureseal Services typically operate with higher-end restoration equipment, which allows for more consistent results, particularly on larger driveways or heavily worn surfaces.

Long-Term Surface Protection Options

Once block paving has been cleaned and re-sanded, additional protection can help extend its lifespan.

Sealant application options

Seal type Finish Protection level
Natural seal Matte appearance Moderate
Colour-enhancing seal Darker, richer finish High
High-gloss seal Wet-look finish Very high
Breathable seal Natural appearance High durability
Sealants help reduce water absorption, slow weed growth and protect against oil penetration.

Benefits of sealing block paving

  • Reduces staining from oil and dirt
  • Slows weed and moss growth
  • Helps stabilise joint sand
  • Enhances overall appearance
  • Makes future cleaning easier
Sealing is typically recommended after full cleaning and re-sanding once the surface has fully settled.

Common Long-Term Maintenance Issues

Even well-maintained block paving can develop problems if not monitored regularly.

Issues to watch for

Issue Early warning sign
Joint sand loss Loose or powdery joints
Surface sinking Uneven stepping areas
Colour fading Sun exposure and weathering
Persistent algae Damp shaded sections
Edge spreading Loss of structural boundary
Early intervention is far more cost-effective than full restoration work later.

Professional Restoration Approach Overview

High-quality restoration work goes beyond surface cleaning. It focuses on rebuilding stability, improving drainage and extending the lifespan of the paving. A full professional approach typically includes:
  • Assessment of structural condition
  • Controlled deep cleaning
  • Targeted stain and weed treatment
  • Complete or partial joint reset
  • Precision re-sanding with correct material
  • Mechanical compaction for stability
  • Optional sealing for long-term protection
Pureseal Services focus on this more comprehensive restoration approach, ensuring that block paving is not only visually improved but also structurally reinforced for long-term durability.

Block Paving Maintenance and Restoration Summary Guide

This section works as a final practical reference for keeping block paving in good condition after cleaning and re-sanding.

Ongoing care checklist

Task What to do Why it matters
Regular sweeping Remove leaves and grit weekly Prevents staining and weed growth
Spot cleaning Treat oil or spill marks quickly Stops permanent staining
Weed control Remove early growth immediately Protects joint structure
Gutter and edge checks Inspect drainage paths Prevents water damage and pooling
Joint inspection Check for sand loss every few months Maintains block stability

Early warning indicators

Sign What it usually means
Loose or rocking blocks Joint sand has weakened
Dark staining spreading Oil or algae is setting in
White residue on surface Efflorescence developing
Gaps forming between blocks Sand washout or movement
Water sitting after rain Drainage or level issue

Best long-term protection approach

  • Keep joints topped up with kiln-dried or polymeric sand where needed
  • Avoid aggressive pressure washing that removes joint material
  • Treat algae early before it spreads across shaded areas
  • Maintain edge restraints to prevent outward movement
  • Consider sealing once the surface has been fully restored and stabilised

Professional maintenance note

For larger driveways, heavily stained surfaces, or areas where block movement is already visible, a full restoration approach is usually more effective than repeated light cleaning. Services such as those provided by Pureseal Services focus on deep cleaning, controlled re-sanding and structural restoration rather than surface-level washing, which helps maintain both appearance and long-term stability of the paving.

Continue Reading